Getting Started
Braid API is a robust solution designed for developers to create and manage financial products with ease. Our operations follow a systematic flow consisting of six fundamental steps: Programs and Products, Create Customer Entity, Create an Account, Create a Counterparty, and Create a Transaction. To get started, first ensure you’re set up with Authentication.
Authentication Overview
The Braid API uses Basic Authentication, which requires clients to include a username and password with each request. In our API, the password field should contain the API key displayed in the dashboard under the "API Key" section.
Most programming libraries have built-in support for Basic Authentication, so you can use your preferred library’s Basic Auth module, which will handle the encoding and header formatting automatically.
Note: Even though the dashboard label reads "API Key," use this value as the password in Basic Authentication requests. This setup ensures secure access to the Braid API while allowing ease of use with standard libraries.
Core Workflow Setup
To begin working with the Braid API, follow these core setup steps, each essential for configuring and creating financial products:
Programs and Products
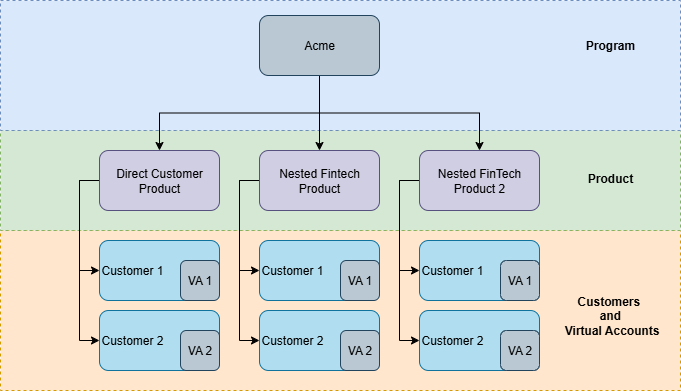
In Braid, a financial program serves as the parent entity, and the bank partner is responsible for setting up both programs and products within their Braid instance. Programs organize various products under them, creating a structured hierarchy.
For example, a bank might establish a Virtual Wallet Program or a Business Payment Program, each containing products like:
- Virtual Wallets: Digital accounts for customers to store funds and make payments.
- International Payments: Accounts enabling domestic cross-border payments.
- Business Payment Accounts: Customized accounts for managing payroll and vendor payments.
- Wholesale ACH Accounts: Accounts designed for high-volume ACH transactions.
Developers are assigned unique product IDs, which are essential for creating and managing business entities within the system.
Create Customer Entity
The progression begins with creating a customer entity, which may represent a business or an individual.
- For Businesses: the following endpoint should be used: POST/business
- For Individuals: the following endpoint should be used: POST/individual
Create Account
Following the customer entity creation, the next step is to establish an account associated with the customer entity:
- For businesses: use the following endpoint: POST/account/business/{id} (Here the
{id}
is the business’ id.) - For individuals: the following endpoint should be used: POST/account/individual/{id (Here the
{id}
is the individual’s id.)
On successful execution of these requests, business or individual bank accounts will be created and linked to the respective entity. These accounts can now perform financial transactions.
Create a Counterparty
Subsequently, a counterparty is created for the customer entity. This process utilizes corresponding accounts rather than the customer type:
- The POST/Counterparty API endpoint facilitates counterparty creation. It accepts information for various linked accounts such as accountId, ACHACH details, braid account details, businessId, name details, individualId, productId, and wire transfer details.
Create a Transaction
The final step involves creating a transaction. This operation is contingent on the type of transaction to be executed. Generally, transactions fall into two categories: Push/Pull and Funding/Withdrawal.
- Transaction push/pull: Refers to transactions to and from a counterparty
- Transaction funding/withdrawal: Refers to transactions pertaining to self, which are managed via the payment instrument endpoint.
Specific transaction operations include:
- Transaction ACH push: POST/transactions/ach/push to initiate a push transaction
- Transaction ACH pull: POST/transactions/ach/pull to initiate a pull transaction
- Transaction ACH funding: The POST/transactions/ach/funding endpoint facilitates the initiation of a transaction, transferring a specified amount of funds to a designated account within the service.
- Transaction ACH withdrawal: With the POST /transactions/ach/withdrawal endpoint, a specified amount of funds can be withdrawn from a specific account, utilizing the ACH network for secure and reliable transactions.
By progressing systematically through these six core steps, developers can effectively navigate the Braid API and effortlessly create a range of financial products.
Updated 21 days ago